

A New Era of RuneScape 3 PvM: Enter Solak, the Grove Guardian
posted by David on 1st June 2018, at 9:00am | Discuss ArticleThe creation of Solak began over a year ago when Mod Ramen began to use his TAPP time to create the games third boss, after Vorago and Telos, formed from the Anima Mundi, the life force of Gielinor that was created by the Elder Gods. After more than a year since the release of Telos (June 27, 2016), Solak was formally announced as coming soon by Mod Mark in a September 2017 behind the scenes video. Aside from poking fun at the way the boss looked, the hype surrounding Solak was tremendous, and the nearly eight month wait began to feel agonizing, especially given the tremendous difficulty and success the two previous Anima Mundi boss encounters. Hundreds of players who hadn’t logged in for months, were mostly playing Old School, or had lost interest in PvM made sure to have supplies and be ready to go for the release of Solak. For the purpose of this article, I will primarily be focusing on duo mode, as it’s the most common current method of taking on Solak. The fight is also rich in lore and history of the lost grove, but I will not be going into great detail on that element of the fight.
What to Expect
In my opinion, Solak is the most difficult group PvM encounter in Runescape, and it is not particularly close. Telos certainly has a much higher cap on difficulty, given that it goes up to 4000 enrage, but what makes Solak so hard is that you and your teammate(s) are immediately thrown into the fire. For experienced PvMers, the first 300 enrage of Telos felt fairly easy, with most people achieving “the Warden” title within a week or two of release. To put the difficulty of this encounter in perspective, it took the first team nearly 10 hours to get a kill in duo mode and nearly twice that amount of time to get the first kill in 7 man whereas Nex: Angel of Death, the last major group boss released, was brought down within a few minutes of the system update. Solak managed to kill over 100,000 players before the first duo team of Pat Rick and Ghost Team killed him for the first time around 10 hours after release. While best in slot gear, high DPS capability, and expensive food certainly help survive mechanics that might ordinarily cause you or your partner to die, the key to success for this boss is precise coordination.
What to Bring
At the time of writing this article, I have only used Magic to fight Solak. Magic is the style I generally felt most comfortable with given its immense versatility with access to damage increasing debuffs such as vulnerability on the normal spell book and also its ability to utilize the ancient spell book to a full extent. While I achieved my first kills utilizing full Achto Primeval, armor I plan on continuing to use for the foreseeable future while performing the primary tanking role for its ability to reset defensive ability cooldowns, it’s by no means necessary. Where Achto resets truly shine is in learning the fight, as they can sometimes save you from deaths if either team mate makes a mistake or is early or late on an ability or intercept. Additionally, during the finals phase you and your partner will take turns in the shadow realm where Achto’s defense can help cause minions to splash. Accuracy on the boss seems to be 100% with tier 90 weapons, so there is no real need for accuracy auras—definitely try our defensive auras such as penance and vampirism when learning. Poison works, so Cinderbane gloves and weapon poison can really help.
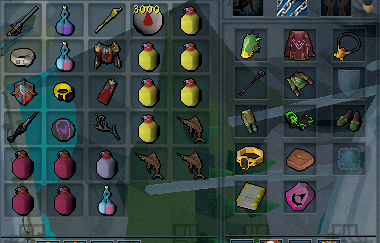
Below is a screenshot of my current layout-when we get more confident I’ll swap the ring of death for an Asylum Surgeon’s Ring, and I really ought to bring a Main hand melee weapon for Bladed Dive, but it hasn’t come up enough to justify it in duos just yet.
Basic Mechanics
Solak always has two health bars, one with his main health pool, and one with the health for the phase. Solak consists of four phases, although many split up phase two into two sections and would say the boss has five phases. Phase one requires you and your partner to surge into blight circles, survive the bomb, kill a series of roots, clear the roots by surging to your arrow than running away, and then passing the DPS check on his arms, legs, and orb when he hunches over. If the DPS check is failed, it’s almost certainly a failed kill because many minions are spawned that deal high amounts of damage. After the orb is brought to zero, the phase will change to P2. Phase 2 is far lengthier and more difficult than phase 1, and it feels like this where the fight truly starts. Anima eruption emerge with a pool of blight in the middle, requiring you to work through a series of deadly mechanics to break his corruption. This is where the need for precise rotations—alternating barricade + intercept in particular—is vital to conserving valuable resources and maintain a high damage output. Phase 3 introduces the concept of the shadow realm and Erethdor himself, who you can finally begin to attack by entering the shadows at the correct time. Fighting him can speed the phase up, but be careful, phasing into Phase 4 before hitting the 300k damage cap (600k in 7 man) will cause P4 to be extremely difficult.
Phase 4 feels like a fight all to its own, for perspective, I managed to get to P4 with most of my food left within 5-6 hours of release, I didn’t get a kill until the 20 hour mark. The phase contains two realms-the pure and beautiful realm of Solak’s mind, and the Shadow realm where Erethdor, having lost control, is attempting to just kill him. You have to simultaneously do damage in the mind realm while healing him in the shadow realm, and the more damage you do in the former, the more damage he takes in the latter. This phase requires maximum use of effort, coordination, and intercept rotations because the shadow realm does not allow healing through any type of consumable item.
Drop Table and Conclusion
The drop table for Solak fits in neatly with the drops for Nex: Angel of Death, with many of them being the exact same but in greater quantities. The loot will pay for supplies and perhaps a bit more in some instances, but are not particularly profitable. The real money will come down to RNG on the rare loot—the Blightbound Crossbows and various cosmetics. Assuming the bows remain around at least 1500m or so, the boss will be quite profitable, but nothing like Angel of Death on release or Telos. This was expected, and I’m quite okay with how it has been balanced, after all, with a boss this well designed the fight is a reward in itself.
Alex’s Analysis – I Value My Runes
posted by Alex 43 on 23rd September 2014, at 2:08am | Discuss ArticleRuneScape is Loded with Free Teleports
posted by Mason on 9th July 2013, at 2:54pm | Discuss ArticleGuest Article: Roleplaying in Runespan
posted by Shane on 31st May 2012, at 11:57pm | Discuss ArticleHighlights of 2011 in 2,011 words
posted by Jasonmrc on 20th December 2011, at 5:42am | Discuss ArticleNext Page »
Tags
 Search