Keep Your Laptop Cool While Keeping Costs Low Pt 2
posted by Pfkninenines on 7th July 2010, at 9:14pm | No CommentsAs you’ll remember from last week, there are several easy ways to lower the processor temperature on your computer. We’ve gone through simple and slightly more complex ways to cool your computer without spending too much dough. As I said last week though, my personal favorite technique doesn’t involve anything physical. Sure, cleaning and correct positioning helps, but a very easy and zero-cost way is software based.
My favorite technique for lowering operating temperatures doesn’t cost a cent. It has the potential to lower both idle and load temperatures, all without impacting performance in huge bounds. Through a simple process of undervolting, you can reduce the temperatures of your CPU which is likely the main source of heat from your machine, especially laptop wise. Undervolting is a process that lowers the voltage supplied to the processor, which will in turn lower the operating temperature of the processor. With modern CPUs (but unfortunately, not too modern) RMClock will have the ability to change the CPU multiplier and required voltage levels, as well as alter the CPU clock speed to give you the performance you require when desired, with power and heat savings to boot.
Now I mentioned that this won’t work on CPUs that are too modern, as the program hasn’t been updated since 2008. All of the i3, i5, and i7 lines will likely not be able to reap the benefits of undervolting at the time of this article’s writing due to lack of support. This being said, on Core 2 Duo (C2D) models, Pentium, Celeron, and a good deal of AMD CPUs, RMClock should be able to provide the majority of features described below.
Before you get too far into tuning with RMClock, it is important to stress your CPU so you can see before/after temperatures to verify that you’re actually getting a benefit for your work. A program like Prime95 will force your CPU into full utilization for a period of time (10-15 minutes should do for an initial reading) allowing you to check your load temperatures with a program like SpeedFan. Record your idle and more importantly, load CPU temperatures.
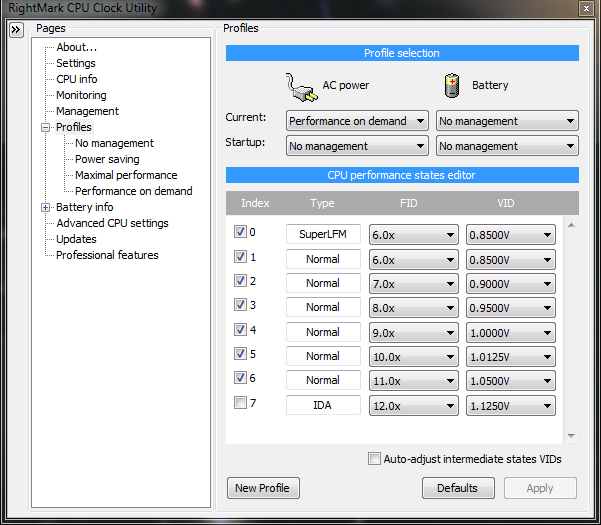
Open RMClock, and go to profiles. Take note of your default voltages as well as multipliers. Generally you’ll want to set the SuperLFM (Super Low Frequency Mode) to the lowest multiplier (in my case 6x) and the lowest voltage (in my case .85v). SuperLFM allows your processor (if available) to underclock on the fly. IDA (Intel Dynamic Acceleration) has varying and generally low to no gains, so I’d recommend not using it if you have the option. It allows a dual core processor to speed up by one step if the other core is idle. The opportunity of this happening is low, so the benefits won’t be apparent if any exist.

Under profiles, I prefer to use the Performance on Demand option. For this, you check every option under P-State Transitions for both the AC and Battery unless you’re not using IDA in which case, exclude that option.

Generally you’ll want to lower the stock voltages, and you’ll have to leave the multiplier the same. Lower by just a bit, then hit apply. Going down by .1 volts at a time is advised, though you can often find guides for your specific model CPU online to get a baseline for the undervolt you’ll be able to accomplish.

Once you have a set undervolt saved as a profile, you’ll want to stress test your voltages to be sure they’re not too low. Do the same tests with Prime95 that you did pre-undervolt and test to make sure you have a stable undervolt. If the voltage is too low for the multiplier, you can BSOD. If this occurs, up the voltages a bit until you find a stable configuration that can run for several hours without issue.
After finishing the testing period, you should have a good idea as to the temperatures of your processor under load, and chances are this will be 5-10C different than your stock voltages. For my own laptop, I’m able to reduce the processor temperature from a max of 85 while playing Mass Effect 2 to 78, or from 77 to 68 while playing a sourced based game such as Team Fortress 2.
In addition to the lowering of temperatures, you should also notice a nice increase in battery life. If you’re planning on being away from a plug for a while, it wouldn’t hurt to create a Power Saving plan with lower voltages and custom OS settings such as dimming the screen, etc to get all that you can out of your battery. Typically, this can add 30-45 minutes of battery life, if you’re doing simple things and not trying to game.
As per usual, you can message me on Runewire, Twitter, or the Forums if you have any questions, or suggestions for future articles.


