

Building a Gaming Computer
posted by Shane on 1st September 2006, at 12:47amSo everyone that is reading this has a computer or at least has access to one. It may be a custom built model or some retail model such as Dell, Gateway, Compaq/HP. These computers you can buy are perfectly fine to own, however you may be ready to take the next leap forward and build your own gaming computer. That is what I will be talking about this month. The definition of a gaming computer is different from person to person. For some it may be a simple machine that can play Runescape or Solitaire for others it may be a $10 000 system that has all the bells and whistles, and plays the latest games with top performance. The computer I will be putting together for the purpose of the article is a gaming computer which has pretty recent technology.
In summary the computer will contain an Intel Core 2 Duo CPU, 2GB of Memory, a 250GB hard drive, and a GeForce 7900GT graphics card. I know many people have strict preferences over whether to buy an Intel or AMD CPU; we are at a time in which Intel is ahead of AMD with their new Core 2 Duo processors. I have included a set of speakers, gaming keyboard, gaming mouse, LCD monitor, and a copy of Windows XP Home Edition along with the hardware. For this build I am assuming that you are going to be starting fresh with no existing hardware that you can reuse. If you have a piece of hardware such as your case, disk drives (Hard Drive and CD/DVD Writer), monitor, keyboard, or mouse you want to reuse this will cut down costs drastically.
Building a computer is actually quite easy compared to what others may have leaded you to believe. It’s a matter of mounting the hardware inside the case and then connecting it all to the motherboard. After it’s all connected you will do the first boot, format the hard drive, and install Windows XP. I do however have a few words of warning: make sure you are in a static free environment, be sure to not directly touch the circuits on the hardware (handle the hardware by holding it by the edges).
Now it’s time to take a look at our parts list:
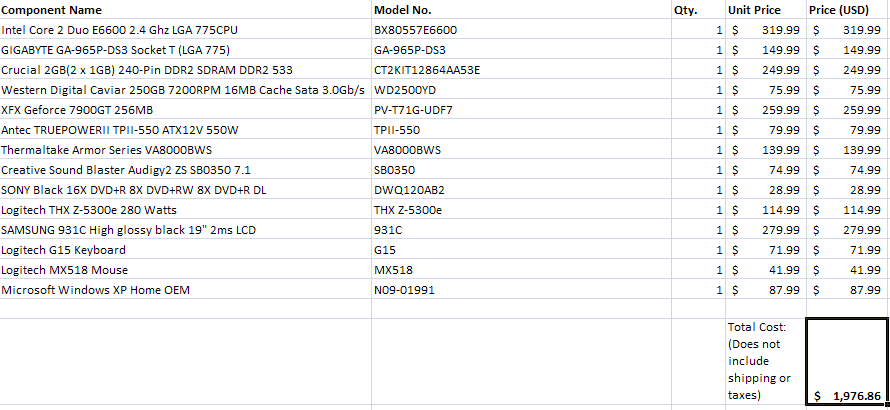
Here’s a rundown of what this list means:
- Intel Core 2 Duo E6600 CPU – I chose this for a CPU because the new Intel Core 2 Duo’s are very fast and have beaten AMD in benchmarks.
- Gigabyte GA-965P Motherboard – This motherboard was chosen because it offers
- Crucial 2GB (2 x 1GB) DDR2 533 -This is a set of 2GB of RAM. The reason that there are 2 1GB sticks is so that the memory can be dual channelled; this just lets it run better.
- Western Digital Caviar 250GB 7200RPM SATA Drive – This is a big SATA hard drive, pretty standard in gaming computers.
- XFX GeForce 7900GT (256MB) – This is a great video card. I am very impressed with my 7800GT, so don’t expect to be let down by this one.
- Antec TRUEPOWERII Power Supply – This is a 550W power supply which is more than enough to drive the 7900GT and any other devices you may have.
- Thermaltake Armor Series Case
- Creative Sound Blaster Audigy2 ZS – I am including a sound card because I have had onboard sound cards fail for me before and stand-alone sound cards often sound better than traditional onboard sound.
- SONY Black 16X DVD/CD Writer – This unit writes DVD’s and CD’s. It also has support for Dual Layer writing.
- Logitech THX Z-5300e Speaker set (280W)
- SAMSUNG 931C 19" 2ms LCD – I chose this LCD screen because of the low response time. When you’re playing games response time is what matters most with LCD screens.
- Logitech G15 Keyboard
- Logitech MX518 Mouse – Most mice out there now are cordless and battery powered. This is a cored mouse and it is the one that I use myself.
- Finally we have the dreaded Windows XP Home Edition.
expandability for the future.
Now this is going to be an excellent gaming system. It comes to $1,976.86 USD (without shipping or taxes). If you want to save a few dollars you can use existing hardware like I mentioned above. The places where you could save the most money are: the speaker set, if you already have a good set then you don’t need to buy another good set unless you want to; the LCD monitor, if you have a good screen already that you like you can save $280 here.
Once the parts have arrived you can take a count and make sure everything has arrived that is needed. I’d recommend finding a good work space such as a kitchen table or somewhere else with lots of light to put it together on.
Now that you are ready to start assembling the computer when you take a component out of the box set it down on the anti-static bag that it came in. Do this for the motherboard and CPU first. Each motherboard is different; you will want to read the manual (for motherboard and CPU) for how to mount the CPU. This CPU comes with a heat sink and fan, so there is no need to worry about whether or not it will come with the package. Once you have read the manual mount the CPU then attack the heat sink and fan.
This is also the best time to add the RAM to the motherboard. You can find the location of the RAM by looking in the manual or spotting it on the motherboard. Since we have 2 sticks of 1GB RAM we want to make it run in dual channel. To do this simply place them in slots 1 and 3. If you want to upgrade later you will place your upgrade in slots 3 and 4. NOTE: Do not force the RAM in. If it’s not going in remove it and try again. Make sure it’s as straight as possible.
Your motherboard will now have the RAM, CPU, heat sink, and fan on it. I’d set it aside for a minute while you attach the power supply to the case. After you’ve attached the power supply it is the best time to attach the motherboard and CPU to the case inside. For attaching components with screws I’d recommend an anti magnetic screw driver since some of the components are sensitive to magnets. Once the motherboard is in the next piece of hardware I’d add would be the hard drive and CD/DVD writer. Seeing that your power supply is connected now is also the best time to connect power to the Hard Drive and CD/DVD Writer. You will also want to attach their data cables to the motherboard (you can see the location of where these connectors are in the manual).
Now that the drives, power supply, and motherboard are all connected to the case this is the best time to add expansion cards (Graphics and Sound). You will want to attach the graphics card to a PCI Express x16 slot which is normally the top expansion slot. You can add the sound card to any PCI slot. NOTE: If the card does not want to go in DO NOT force it, this will damage your card and make it a worthless chunk of plastic!
Most if not all of your components now will be connected to the motherboard and will be being fed power. Now is the time to seal it up and do first boot, format, and install XP. I am not going to give step by step instructions for this part as it is very long and there are lots of guides out there on the internet.
If all goes well you have built yourself a brand new gaming computer.
Some final notes:
- If you are at all feeling unsure about the exact process after reading this, I’d recommend you get a friend who has done it before to come over to help you.
- After you have got XP working and installed successfully do not forget to install the latest service packs and updates, get an anti virus program, and one of the alternate browsers (Opera or Firefox).
- Lastly do not freak out, if something does not work you can almost find an answer by searching on the web.
Enjoy your new gaming computer!
We’ve had a few tech sections now on RSBANDBInformer!, I want your feedback. Are the articles too indepth, not indepth enough, too advanced, or too elementary? Let me know at shane@rsbandb.com you can also send me suggestions for future articles too if you want, I’ll be sure to credit you for where I got the idea.
~Shane12088
2 Comments
 Search
2nd April 2010, at 2:07am
Very cool dude! I found your blog through Google searches and I really love what you are doing! The effort you have put into your posting is awesome and I hope you keep up with it! Thank you!
13th May 2010, at 3:56pm
Hi, it’s a bit offtopic but may I ask you where did you get this blog template? I’m going to start bloggin as well, I’m a bit noob though but I really like it 😉 Let me know…